Overview
In this lab, you’ll learn how to deploy a cluster of distributed Memcached servers on Kubernetes Engine using Kubernetes, Helm, and Mcrouter. Memcached is one of the most popular open-source, multi-purpose caching systems. It usually serves as a temporary store for frequently used data to speed up web applications and lighten database loads.
What you’ll learn
- Learn about some characteristics of Memcached’s distributed architecture.
- Deploy a Memcached service to Kubernetes Engine using Kubernetes and Helm.
- Deploy Mcrouter, an open source Memcached proxy, to improve the system’s performance.
Memcached’s characteristics
Memcached has two main design goals:
- Simplicity: Memcached functions like a large hash table and offers a simple API to store and retrieve arbitrarily shaped objects by key.
- Speed: Memcached holds cache data exclusively in random-access memory (RAM), making data access extremely fast.
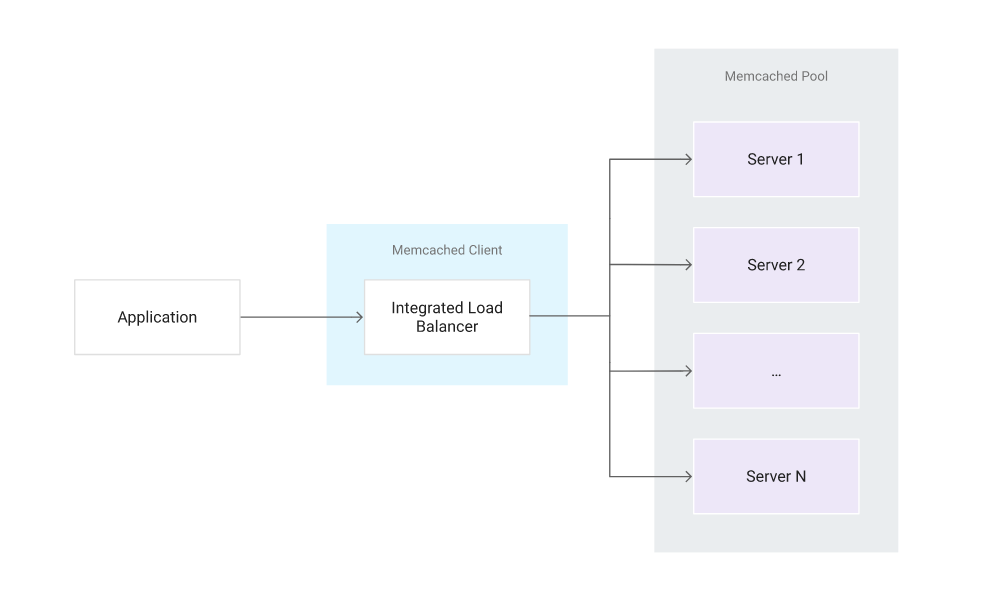
Memcached is a distributed system that allows its hash table capacity to scale horizontally across a pool of servers. Each Memcached server operates in complete isolation from the other servers in the pool. Therefore, the routing and load balancing between the servers must be done at the client level. Memcached clients apply a consistent hashing scheme to appropriately select the target servers. This scheme guarantees the following conditions:
- The same server is always selected for the same key.
- Memory usage is evenly balanced between the servers.
- A minimum number of keys are relocated when the pool of servers is reduced or expanded.
The following diagram illustrates at a high level the interaction between a Memcached client and a distributed pool of Memcached servers.
Setup and requirements
Activate Cloud Shell
Cloud Shell is a virtual machine that is loaded with development tools. It offers a persistent 5GB home directory and runs on the Google Cloud. Cloud Shell provides command-line access to your Google Cloud resources.
- Click Activate Cloud Shell
at the top of the Google Cloud console.
When you are connected, you are already authenticated, and the project is set to your PROJECT_ID. The output contains a line that declares the PROJECT_ID for this session: Your Cloud Platform project in this session is set to YOUR_PROJECT_ID
gcloud is the command-line tool for Google Cloud. It comes pre-installed on Cloud Shell and supports tab completion.
- (Optional) You can list the active account name with this command:
gcloud auth list
- Click Authorize.
Task 1. Deploying a Memcached service
A simple way to deploy a Memcached service to Kubernetes Engine is to use a Helm chart.
- In Cloud Shell, create a new Kubernetes Engine cluster of three nodes:
gcloud container clusters create demo-cluster –num-nodes 3 –zone us-central1-f
This deployment will take between five and ten minutes to complete. You may see a warning about default scopes that you can safely ignore as it has no impact on this lab.Note: The cluster’s zone specified here is arbitrary. You can select another zone for your cluster from the available zones.
Configure Helm
Helm is a package manager that makes it easy to configure and deploy Kubernetes applications. Your Cloud Shell will already have a recent, stable version of Helm pre-installed.
If curious, you can run helm version in Cloud Shell to check which version you are using and also ensure that Helm is installed.
- Add Helm’s stable chart repository:
helm repo add stable https://charts.helm.sh/stable
- Update the repo to ensure you get the latest list of charts:
helm repo update
- Install a new Memcached Helm chart release with three replicas, one for each node:
helm install mycache stable/memcached –set replicaCount=3
The Memcached Helm chart uses a StatefulSet controller. One benefit of using a StatefulSet controller is that the pods’ names are ordered and predictable. In this case, the names are mycache-memcached-{0..2}. This ordering makes it easier for Memcached clients to reference the servers.Note: If you get: “Error: could not find a ready tiller pod.” wait a few seconds and retry the Helm install command. The tiller pod may not have had time to initialize.
- Execute the following command to see the running pods:
kubectl get pods
Resulting output:NAME READY STATUS RESTARTS AGE mycache-memcached-0 1/1 Running 0 45s mycache-memcached-1 1/1 Running 0 35s mycache-memcached-2 1/1 Running 0 25s
You may need to run the previous command again to see all three pods in the Ready 1/1 status.
Discovering Memcached service endpoints
The Memcached Helm chart uses a headless service. A headless service exposes IP addresses for all of its pods so that they can be individually discovered.
- Verify that the deployed service is headless:
kubectl get service mycache-memcached -o jsonpath=”{.spec.clusterIP}” ; echo
The output None confirms that the service has no clusterIP and that it is therefore headless.
- In this lab the service creates a DNS record for a hostname of the form:
[SERVICE_NAME].[NAMESPACE].svc.cluster.local
In this lab the service name is mycache-memcached. Because a namespace was not explicitly defined, the default namespace is used, and therefore the entire hostname is mycache-memcached.default.svc.cluster.local. This hostname resolves to a set of IP addresses and domains for all three pods exposed by the service. If, in the future, some pods get added to the pool, or old ones get removed, kube-dns will automatically update the DNS record.
It is the client’s responsibility to discover the Memcached service endpoints. To do that:
- Retrieve the endpoints’ IP addresses:
kubectl get endpoints mycache-memcached
The output is similar to the following:NAME ENDPOINTS AGE mycache-memcached 10.36.0.32:11211,10.36.0.33:11211,10.36.1.25:11211 3m
Notice that each Memcached pod has a separate IP address. These IP addresses might differ for your own server instances. Each pod listens to port 11211, which is Memcached’s default port.
There are a number of alternative methods that can be used such as these two optional examples. You can carry out these steps if you have time, or move directly to the next step where you test the deployment using telnet:
Note – alternate methods: You can retrieve those same records using a standard DNS query with the nslookup command:kubectl run -it –rm alpine –image=alpine:3.6 –restart=Never nslookup mycache-memcached.default.svc.cluster.local
The output is similar to the following:Name: mycache-memcached.default.svc.cluster.local Address 1: 10.0.0.8 mycache-memcached-0.mycache-memcached.default.svc.cluster.local Address 2: 10.0.1.5 mycache-memcached-2.mycache-memcached.default.svc.cluster.local Address 3: 10.0.2.3 mycache-memcached-1.mycache-memcached.default.svc.cluster.local pod “alpine” deleted
Note: You can ignore the nslookup: can't resolve '(null)': Name does not resolve flag if it shows up. Notice that each server has its own domain name of the following form:[POD_NAME].[SERVICE_NAME].[NAMESPACE].svc.cluster.local
For example, the domain for the mycache-memcached-0 pod is: Mycache-memcached-0.mycache-memcached.default.svc.cluster.local
Note: For another alternative approach, you can perform the same DNS inspection by using a programming language like Python.
- Start a Python interactive console inside your cluster:
kubectl run -it –rm python –image=python:3.6-alpine –restart=Never python
- In the Python console, run these commands:
import socket
print(socket.gethostbyname_ex(‘mycache-memcached.default.svc.cluster.local’))
Note: It takes a while for the pod to get deleted, please wait.Note: The output is similar to the following and is echoed to the console before the exit() command:('mycache-memcached.default.svc.cluster.local', ['mycache-memcached.default.svc.cluster.local'], ['10.36.0.32', '10.36.0.33', '10.36.1.25'])
- Test the deployment by opening a telnet session with one of the running Memcached servers on port
11211:
kubectl run -it –rm alpine –image=alpine:3.6 –restart=Never telnet mycache-memcached-0.mycache-memcached.default.svc.cluster.local 11211
This will open a session to the telnet interface with no obvious prompt. Don’t mind the If you don't see a command prompt, try pressing enter–you can start plugging in commands right away (even if the formatting looks a little off.)
At the telnet prompt run these commands using the Memcached ASCII protocol to confirm that telnet is actually connected to a Memcached server instance. As this is a telnet session, enter each set of commands and wait for the response to avoid getting commands and responses mixed on the console.
- Store the key:
set mykey 0 0 5 hello
Press Enter and you will see the response:
STORED
- Retrieve the key:
get mykey
Press Enter and you will see the response:
VALUE mykey 0 5 hello END
- Quit the telnet session:
quit
Press Enter to close the session if it does not automatically exit.
Note: It takes a while for the pod to get deleted, please wait.
Task 2. Implementing the service discovery logic
You are now ready to implement the basic service discovery logic shown in the following diagram.
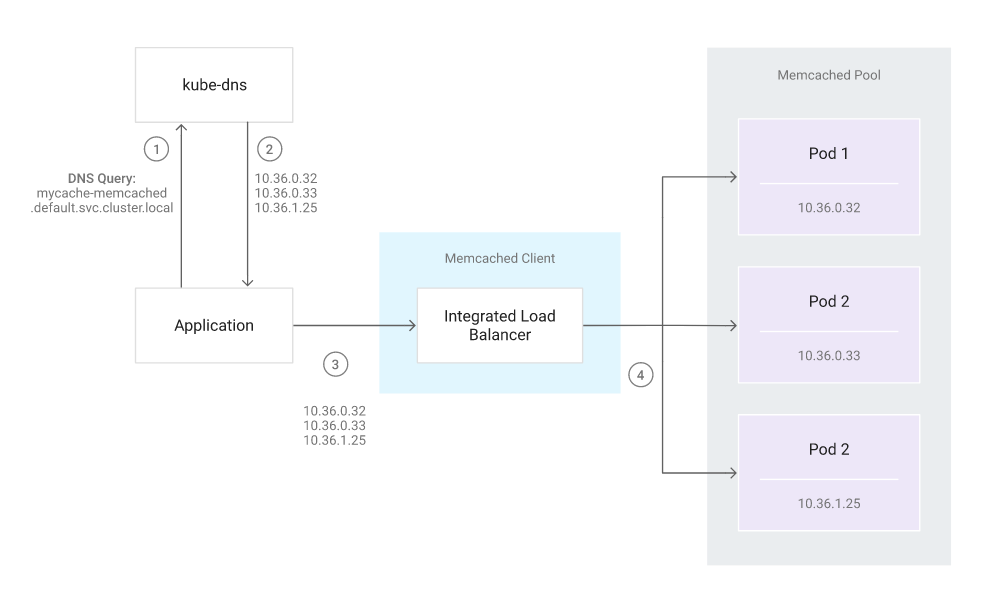
At a high level, the service discovery logic consists of the following steps:
- The application queries
kube-dnsfor the DNS record ofmycache-memcached.default.svc.cluster.local. - The application retrieves the IP addresses associated with that record.
- The application instantiates a new Memcached client and provides it with the retrieved IP addresses.
- The Memcached client’s integrated load balancer connects to the Memcached servers at the given IP addresses.
Implement the service discovery logic
You now implement this service discovery logic by using Python.
- Deploy a new Python-enabled pod in your cluster and start a shell session inside the pod:
kubectl run -it –rm python –image=python:3.6-alpine –restart=Never sh
- Once you get a shell prompt (
/ #) install the pymemcache library:
pip install pymemcache
- Start a Python interactive console by running the
pythoncommand.
python
- In the Python console (
>>>), run the following:
import socket from pymemcache.client.hash import HashClient _, _, ips = socket.gethostbyname_ex(‘mycache-memcached.default.svc.cluster.local’) servers = [(ip, 11211) for ip in ips] client = HashClient(servers, use_pooling=True) client.set(‘mykey’, ‘hello’) client.get(‘mykey’)
Note: If you are getting the error SyntaxError: multiple statements found while compiling a single statement then run the above command line by line.
The output that results from the last command:b’hello’
The b prefix signifies a bytes literal, which is the format in which Memcached stores data.
- Exit the Python console:
exit()
Exit the pod’s shell session by pressing Control+D.
Task 3. Enabling connection pooling
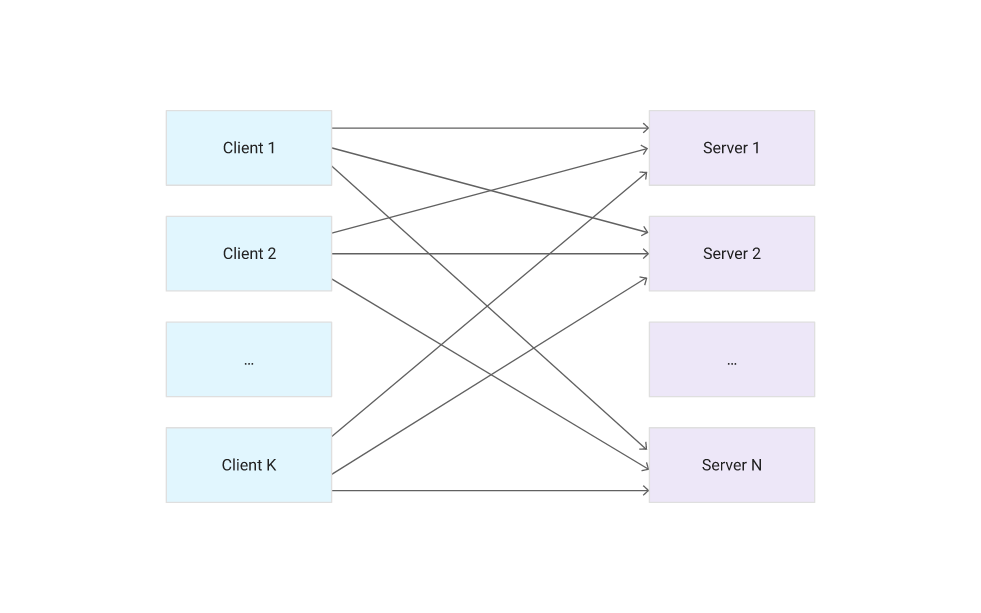
As your caching needs grow, and the pool scales up to dozens, hundreds, or thousands of Memcached servers, you might run into some limitations. In particular, the large number of open connections from Memcached clients might place a heavy load on the servers, as the following diagram shows.
To reduce the number of open connections, you must introduce a proxy to enable connection pooling, as in the following diagram.
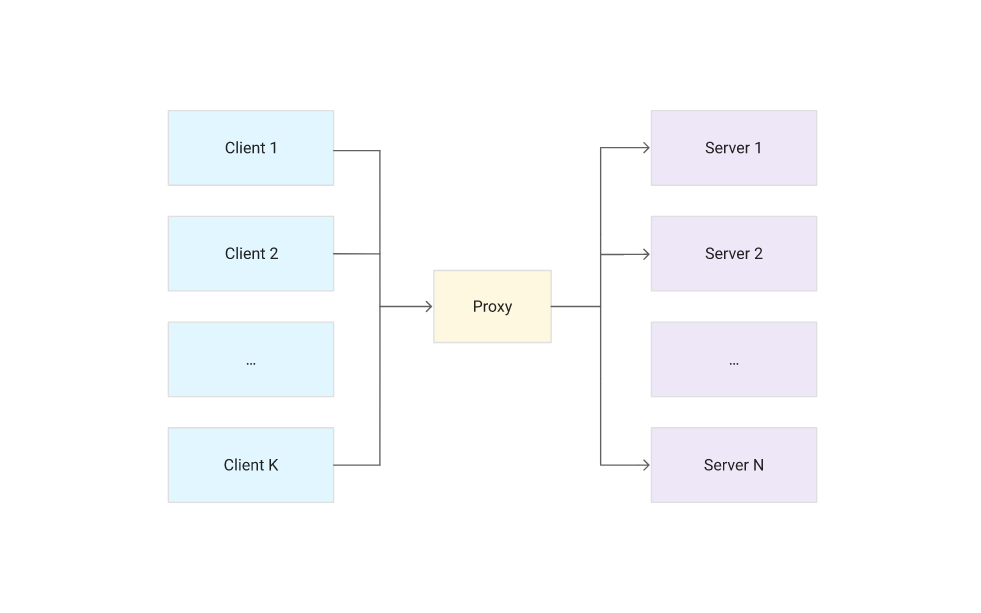
Mcrouter (pronounced “mick router”), a powerful open source Memcached proxy, enables connection pooling. Integrating Mcrouter is seamless, because it uses the standard Memcached ASCII protocol. To a Memcached client, Mcrouter behaves like a normal Memcached server. To a Memcached server, Mcrouter behaves like a normal Memcached client.
Deploy Mcrouter
To deploy Mcrouter, run the following commands in Cloud Shell.
- Uninstall the previously installed
mycacheHelm chart release:
helm delete mycache
Outputrelease “mycache” uninstalled
- Deploy new Memcached pods and Mcrouter pods by installing a new Mcrouter Helm chart release:
helm install mycache stable/mcrouter –set memcached.replicaCount=3
- Check the status of the sample application deployment:
kubectl get pods
Repeat the kubectl get pods command periodically until all 3 of the mycache-mcrouter pods report a STATUS of Running and a READY state of 1/1. This may take a couple of minutes. Three mycache-memcached pods are also started by this command and they will initialize first, however you must wait for the mycache-mcrouter pods to be fully ready before proceeding or the pod ip-addresses will not be configured.
Once you see the READY state of 1/1 the mycache-mcrouter proxy pods are now ready to accept requests from client applications.
- Test this setup by connecting to one of the proxy pods. Use the
telnetcommand on port5000, which is Mcrouter’s default port.
MCROUTER_POD_IP=$(kubectl get pods -l app=mycache-mcrouter -o jsonpath=”{.items[0].status.podIP}”)
kubectl run -it –rm alpine –image=alpine:3.6 –restart=Never telnet $MCROUTER_POD_IP 5000
This will open a session to the telnet interface with no obvious prompt. It’ll be ready right away.
In the telnet prompt, run these commands to test the Mcrouter configuration:
- Store a key:
set anotherkey 0 0 15 Mcrouter is fun
- Press ENTER and you will see the response:
STORED
- Retrieve the key:
get anotherkey
- Press ENTER and you will see the response:
VALUE anotherkey 0 15 Mcrouter is fun END
- Quit the telnet session.
quit
You have now deployed a proxy that enables connection pooling.
Task 4. Reducing latency
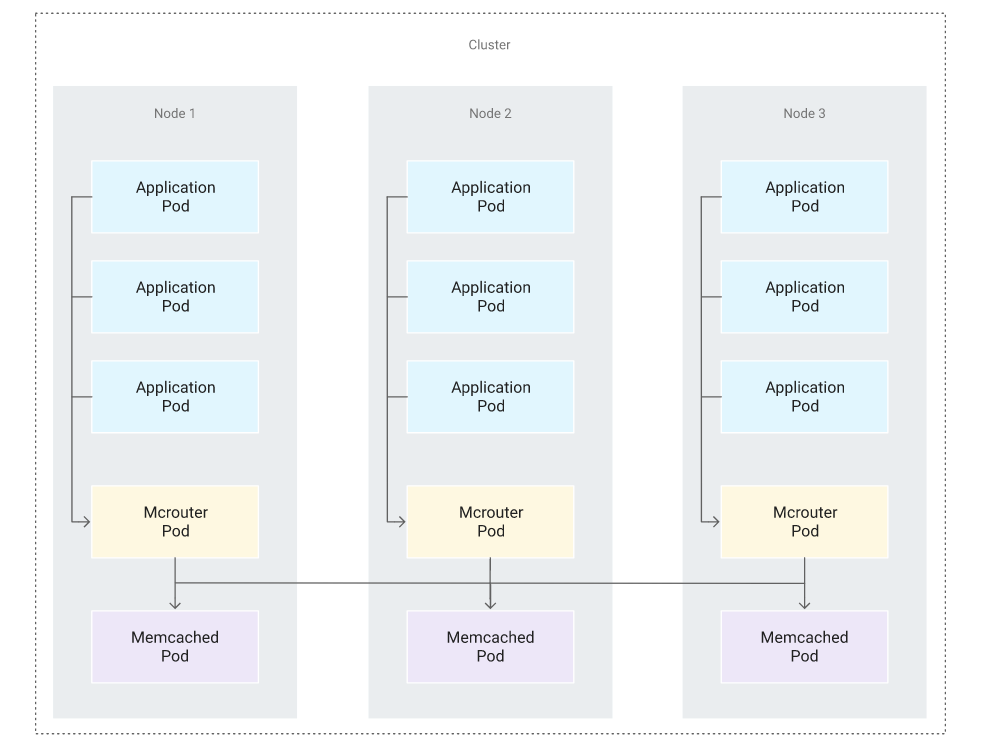
To increase resilience, it is common practice to use a cluster with multiple nodes. This lab uses a cluster with three nodes. However, using multiple nodes also brings the risk of increased latency caused by heavier network traffic between nodes.
Colocating proxy pods
You can reduce the latency risk by connecting client application pods only to a Memcached proxy pod that is on the same node. The following diagram illustrates this configuration which shows the topology for the interactions between application pods, Mcrouter pods, and Memcached pods across a cluster of three nodes.
In a production environment, you would create this configuration as follows:
- Ensure that each node contains one running proxy pod. A common approach is to deploy the proxy pods with a DaemonSet controller. As nodes are added to the cluster, new proxy pods are automatically added to them. As nodes are removed from the cluster, those pods are garbage-collected. In this lab, the Mcrouter Helm chart that you deployed earlier uses a DaemonSet controller by default. So this step is already complete.
- Set a hostPort value in the proxy container’s Kubernetes parameters to make the node listen to that port and redirect traffic to the proxy. In this lab, the Mcrouter Helm chart uses this parameter by default for port
5000. So this step is also already complete. - Expose the node name as an environment variable inside the application pods by using the
spec.enventry and selecting thespec.nodeNamefieldRefvalue. See more about this method in the Kubernetes documentation. You will perform this step in the next section.
Configure application pods to expose the Kubernetes node name as an environment variable
- Deploy some sample application pods with the
NODE_NAMEenvironment variable configured to contain the Kubernetes node name by entering the following in the Google Cloud Shell:
cat <<EOF | kubectl create -f – apiVersion: apps/v1 kind: Deployment metadata: name: sample-application-py spec: replicas: 5 selector: matchLabels: app: sample-application-py template: metadata: labels: app: sample-application-py spec: containers: – name: python image: python:3.6-alpine command: [ “sh”, “-c”] args: – while true; do sleep 10; done; env: – name: NODE_NAME valueFrom: fieldRef: fieldPath: spec.nodeName EOF
- Enter the following command to check the status of the
sample application-pydeployment:
kubectl get pods
- Repeat the
kubectl get podscommand until all 5 of thesample-applicationpods report aStatusofRunningand aREADYstate of1/1. This may take a minute or two.
- Verify that the node name is exposed to each pod, by looking inside one of the sample application pods:
POD=$(kubectl get pods -l app=sample-application-py -o jsonpath=”{.items[0].metadata.name}”) kubectl exec -it $POD — sh -c ‘echo $NODE_NAME’
You will see the node’s name in the output in the following form:gke-demo-cluster-default-pool-XXXXXXXX-XXXX
Connecting the pods
The sample application pods are now ready to connect to the Mcrouter pod that runs on their respective mutual nodes at port 5000, which is Mcrouter’s default port.
- Use the node name that was outputted when you ran the previous command (
kubectl exec -it $POD -- sh -c 'echo $NODE_NAME) and use it in the following to initiate a connection for one of the pods by opening a telnet session:
kubectl run -it –rm alpine –image=alpine:3.6 –restart=Never telnet gke-demo-cluster-default-pool-XXXXXXXX-XXXX 5000
Remember, telnet prompts aren’t obvious, so you can start plugging commands in right away.
- In the
telnetprompt, run these commands:
get anotherkey
This command outputs the value of this key that we set on the memcached cluster using Mcrouter in the previous section:VALUE anotherkey 0 15 Mcrouter is fun END
- Quit the telnet session.
quit
Finally, to demonstrate using code:
- Open up a shell on one of the application nodes and prepare an interactive Python session.
kubectl exec -it $POD — sh
pip install pymemcache
python
On the Python command line, enter the following Python commands that set and retrieve a key value using the NODE_NAME environment variable to locate the Mcrouter node from the application’s environment. This variable was set in the sample application configuration.
import os from pymemcache.client.base import Client NODE_NAME = os.environ[‘NODE_NAME’] client = Client((NODE_NAME, 5000)) client.set(‘some_key’, ‘some_value’) result = client.get(‘some_key’) result
You will see output similar to:b’some_value’
- Finally retrieve the key value you set earlier:
result = client.get(‘anotherkey’) result
You will see output similar to:b’Mcrouter is fun’
- Exit the Python interactive console
exit()
- Then press Control+D to close the shell to the sample application pod.
Congratulations!
You have now completed the Deploying Memcached on Kubernetes Engine lab.